Loan Amendments & Update Terms
Last updated April 27, 2026
Overview
Loan amendments in Hypercore allow you to update an active loan’s terms after it has been approved and disbursed. This is handled through the Loan Sidebar → Terms Tab.
Amendments (update loan terms) ensure historical terms remain intact while new terms take effect from the specified effective date.
For pre-disbursement corrections or small administrative changes, you can also use Update Existing Terms, which directly edits the loan record without creating a formal amendment.
Creating New Terms Vs. Editing Existing Terms
Update Existing Terms (Direct Edit)
- What it does: Directly changes the loan record’s terms (e.g., update interest rate, maturity date, repayment frequency) without creating a formal amendment entry. When to use:
- Correcting data-entry mistakes (typos, wrong start date, wrong basis).
- Adjustments made before disbursement (loan not yet active)
- Administrative updates where audit history isn’t needed
- Impact:
- No amendment (loan terms) record is created.
- Audit trail shows “field updated” but not in an amendment workflow.
- The expected schedule is recalculated immediately.
Create a New Terms
- What it does: Opens a formal amendment workflow. Captures the old vs. new terms, with date-stamped history.
- When to use:
- Any negotiated change after disbursement (e.g., new interest rate, extended maturity, grace period added).
- Situations requiring auditability & lender/borrower visibility.
- Regulatory or investor reporting contexts where term history matters.
- Impact:
- A new Terms record is saved.
- Prior schedule remains preserved under “Original” or “Previous Amendment.”
- New terms apply prospectively from the amendment effective date.
Step by Step: Creating New Terms
- Navigate to the Loan
- Go to your Loan
- Select the loan you want to amend

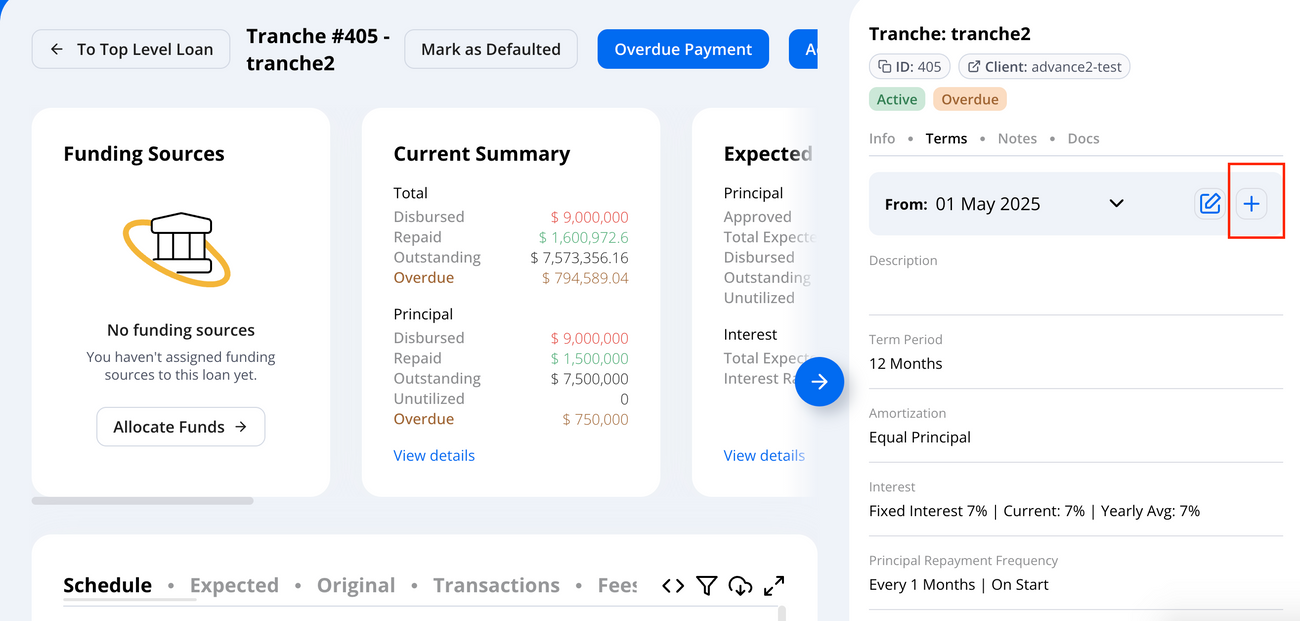
- Create New Terms
- Under the loan details, you’ll see the current set of terms
- The original terms are saved when the loan was booked
- Click the ➕ (plus icon) to create an amendment.
- Update the new terms details
- Enter the effective date of the amendment.
- The system will pre-fill the latest terms, so you don’t need to re-enter everything.
- Adjust only the specific field(s) that need to change (e.g., approved amount)
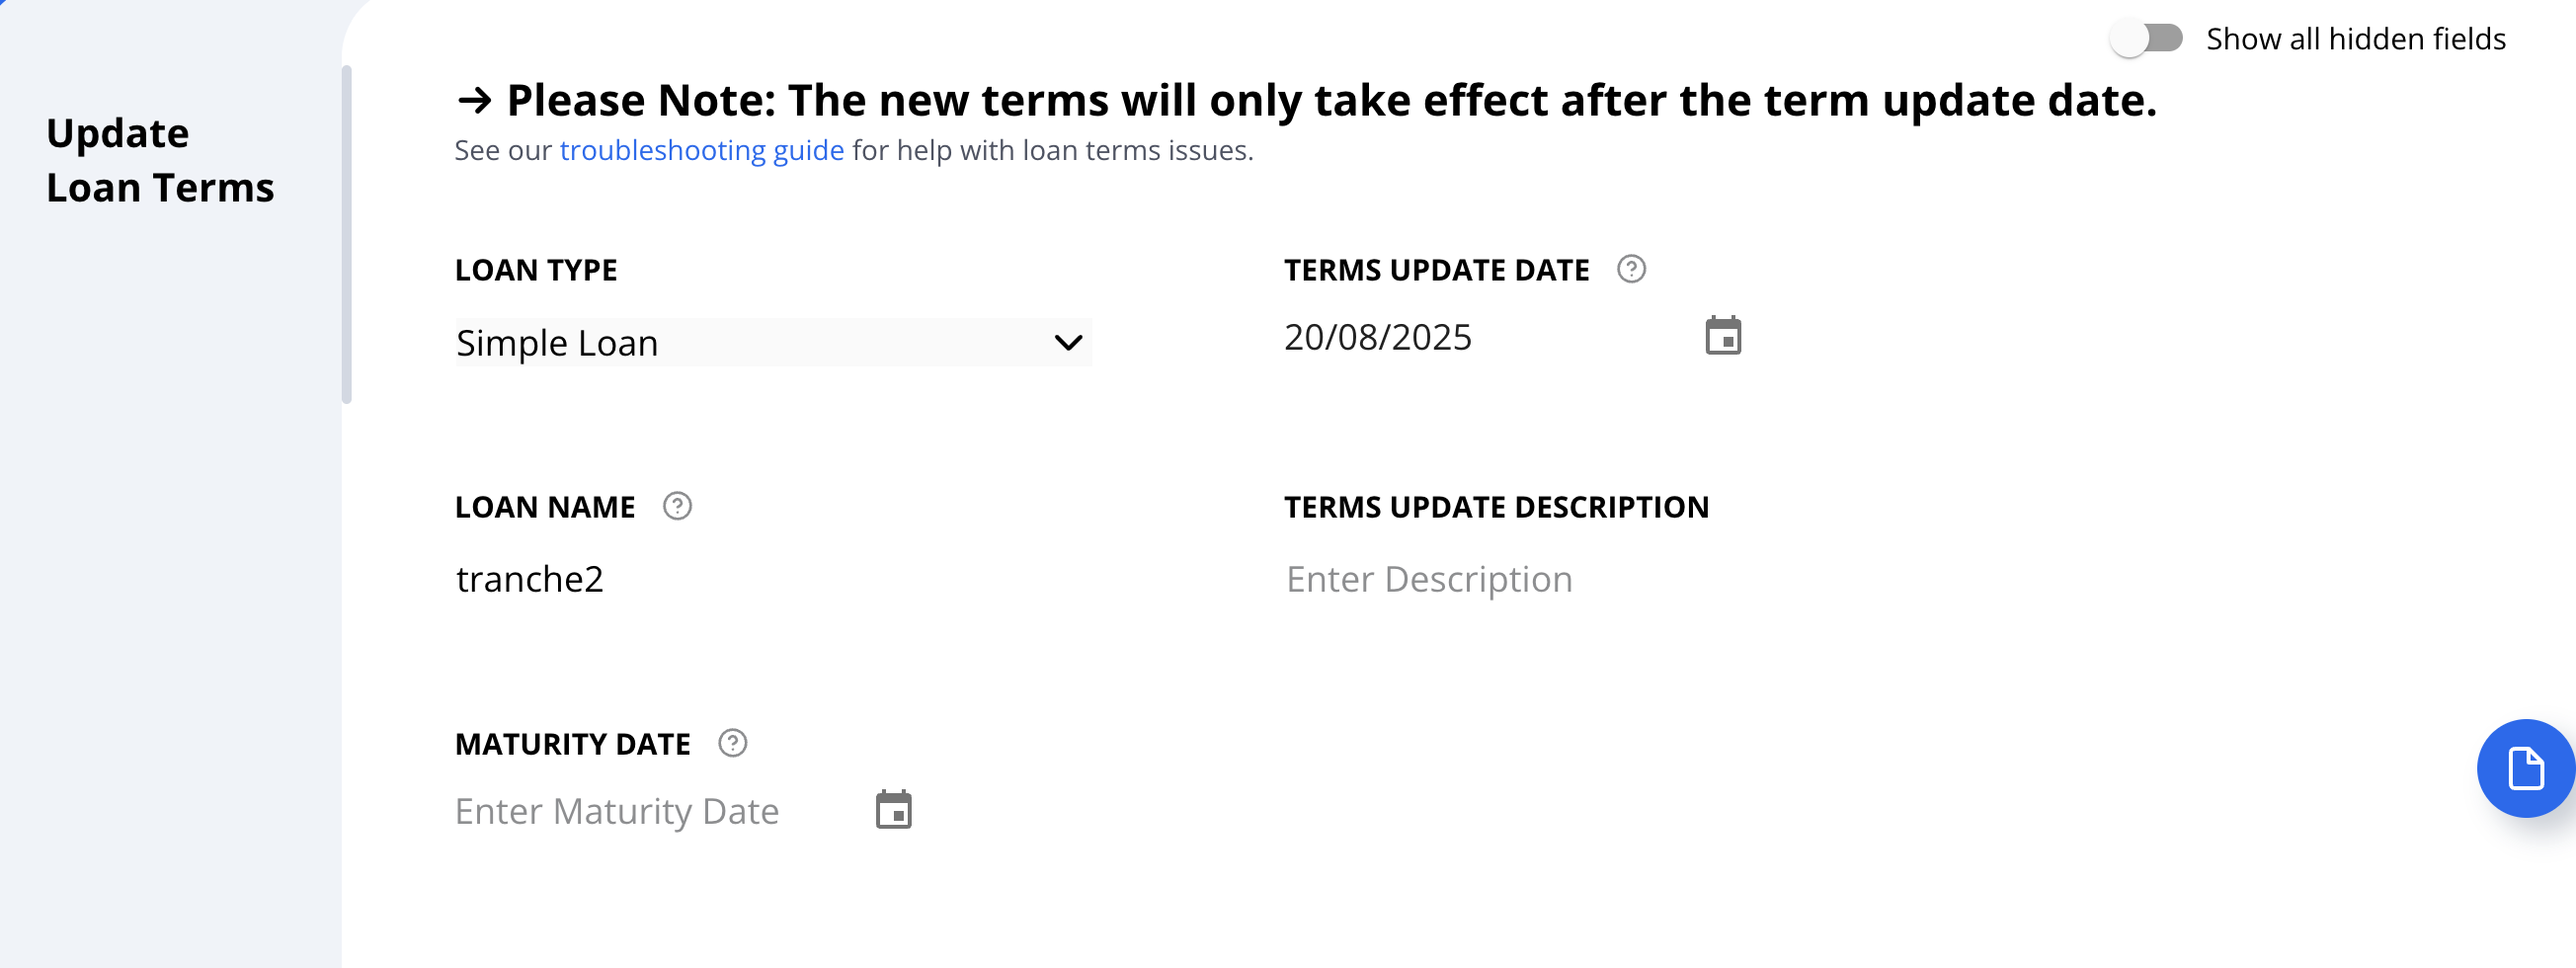
Add a description (best practice) for the reason of the amendment. This helps maintain a clear audit trail
- Review & Save
- Click Show Preview at the bottom of the screen to review the updated schedule.
- Verify that all changes are correct and match the effective date.
- Click Submit to apply the new terms from the selected date.
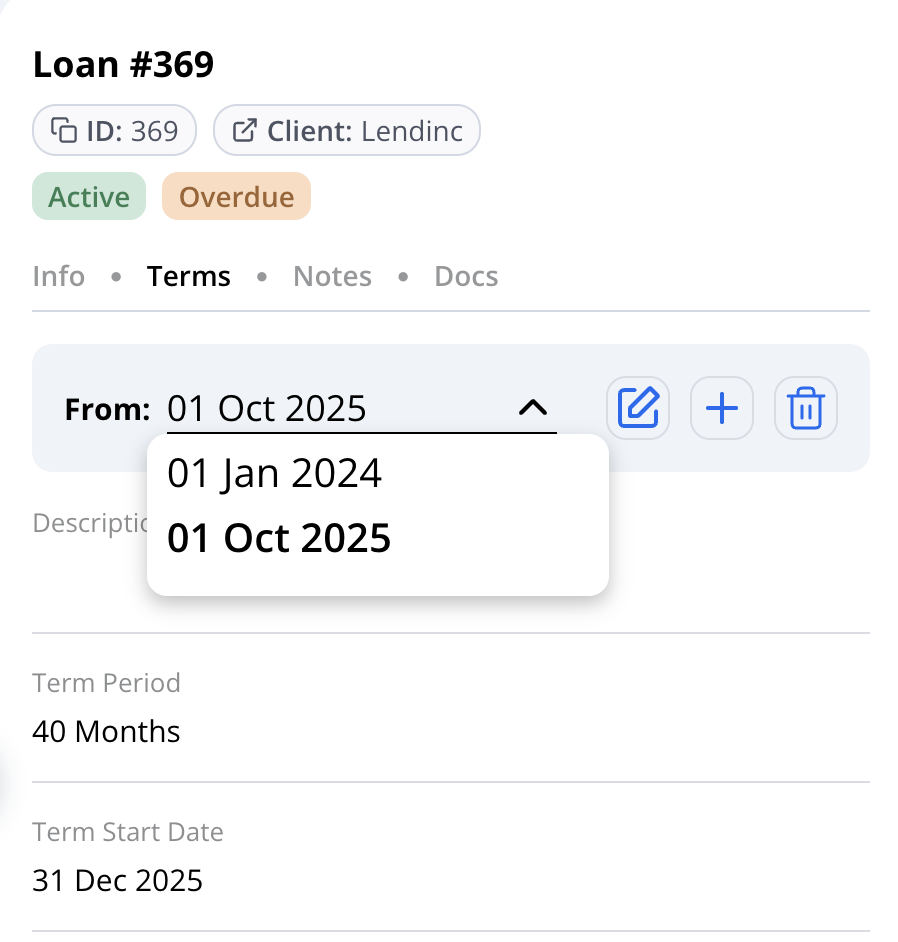
- View the updated terms
- In the terms tab, use the dropdown to view all saved terms.
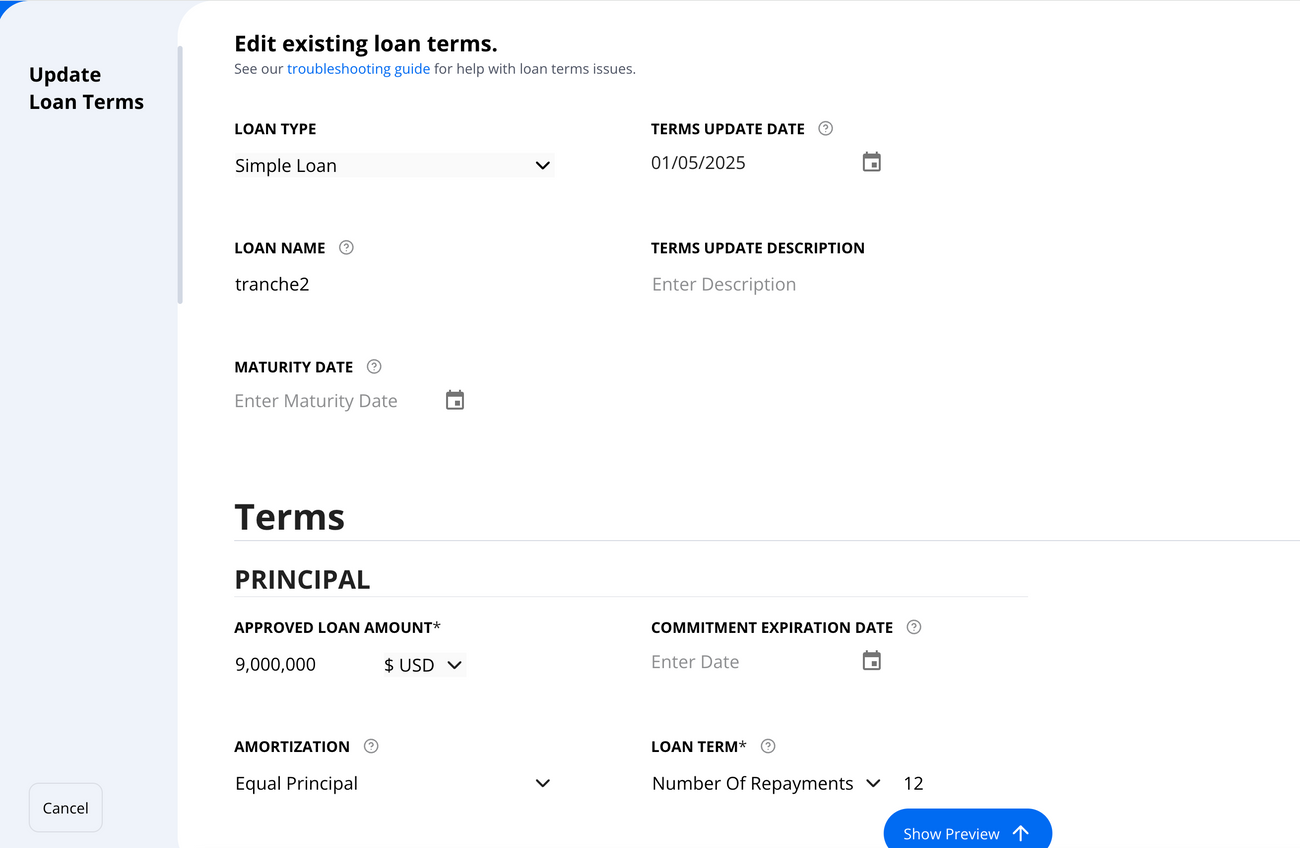
Step by Step: Edit Existing Loan Terms
- Navigate to the Loan
- Go to your Loan
- Select the loan you want to amend
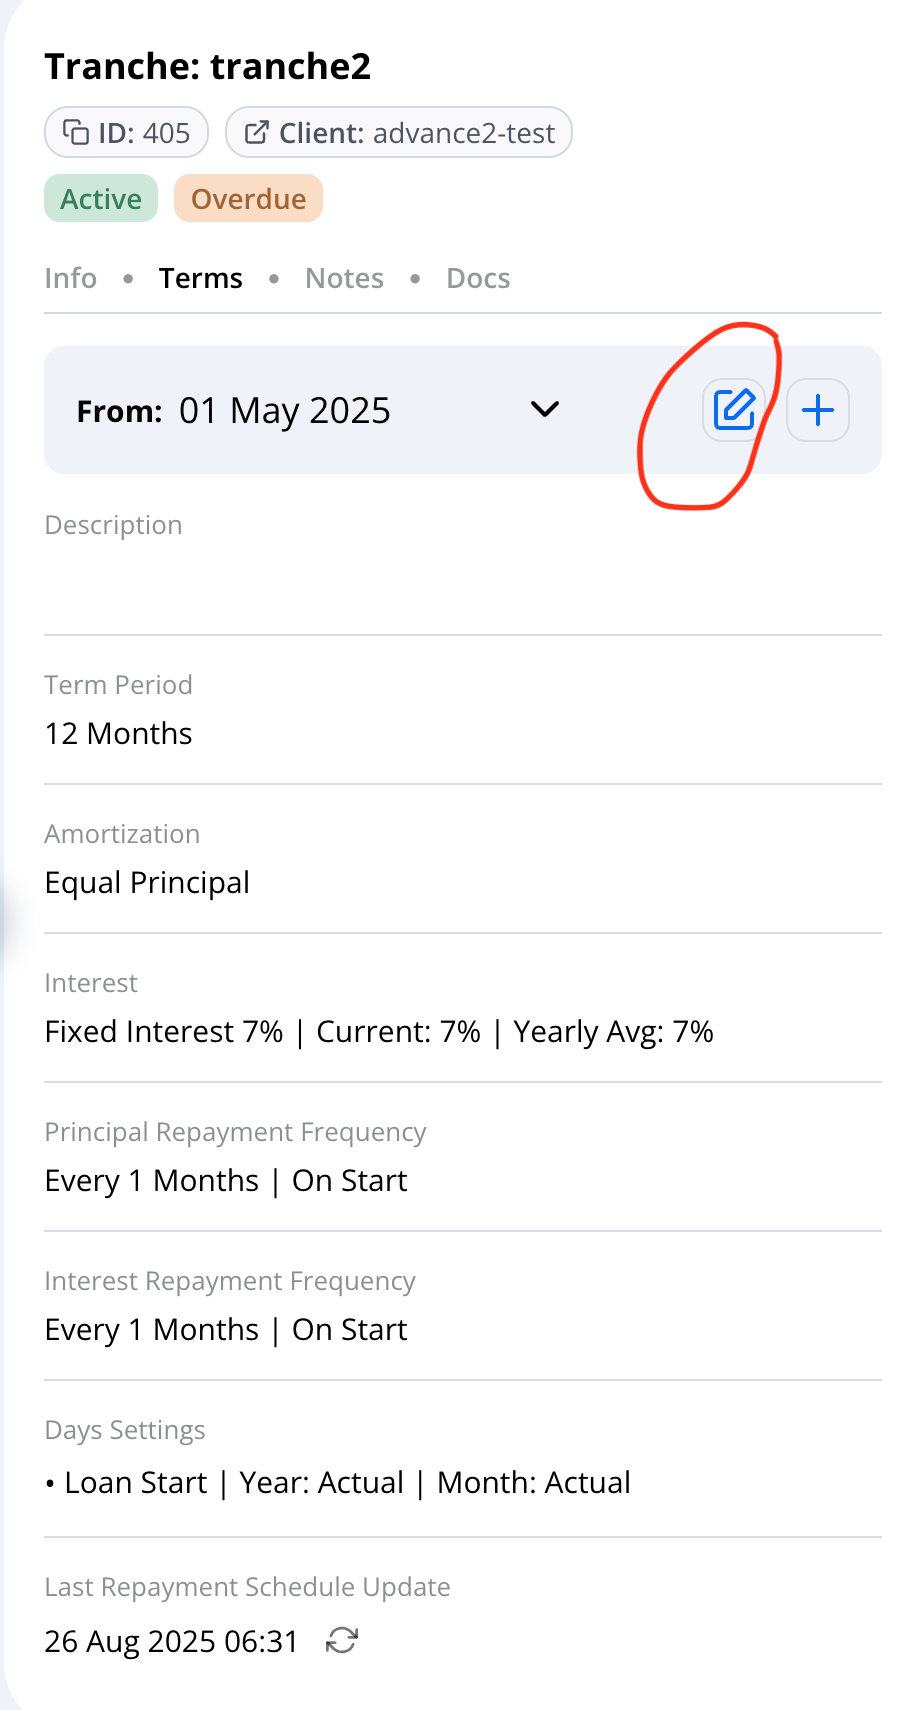
- Open edit existing loan terms
- In the Terms Tab, chose the terms you want to edit
- click the ✏️ Edit icon to update the terms
- Update loan terms
- Easily adjust loan terms from the familiar setup page you used when creating them.
- When done, click on update existing terms
⚠️ Note on Fees:
Fee changes are managed in the Fees Tab of the Loan Page (not in Terms). Update a fee: Fees Tab -> ⋮ (3 dots) -> Update Fee Create a fee: Fees Tab -> ➕ (plus) For further guided detail please see here

Common Use Cases
1. Maturity Date Extension
Example: Extending a loan maturity from June 2025 → December 2025.
- Open the loan and navigate to the Terms tab.
- Select “Add Terms” .
- Navigate to the principal section -> Loan Term where you have two options:
- End Date ->Enter the new loan maturity date (e.g.
31-Dec-2025) - Number of Repayments -> extend the number of repayments so the schedule ends on
31-Dec-2025
- Confirm schedule recalculation → save the amendment
- Validate in the Schedule view:
- Expected repayment dates now extend through December 2025.
- Interest continues accruing to the new maturity.
2. Adding PIK / Compounding Interest
Example: Adding a Compounding Interest feature mid-loan.
- Open the loan record and go to the Terms tab.
- Select “Add Terms” → “Interest Terms”.
- Define the Terms Update Date (e.g.,
01-Oct-2025) when Compounding begins. - In the Interest Section:
- Enable Compounding.
- Select whether accrued compounding capitalizes on a monthly, quarterly, or annual basis.
- Set the compounding interest payment frequency.
- Save the terms.
- Validate in the Schedule view
- Rows from the terms' effective date show “Compounding Interest” columns.
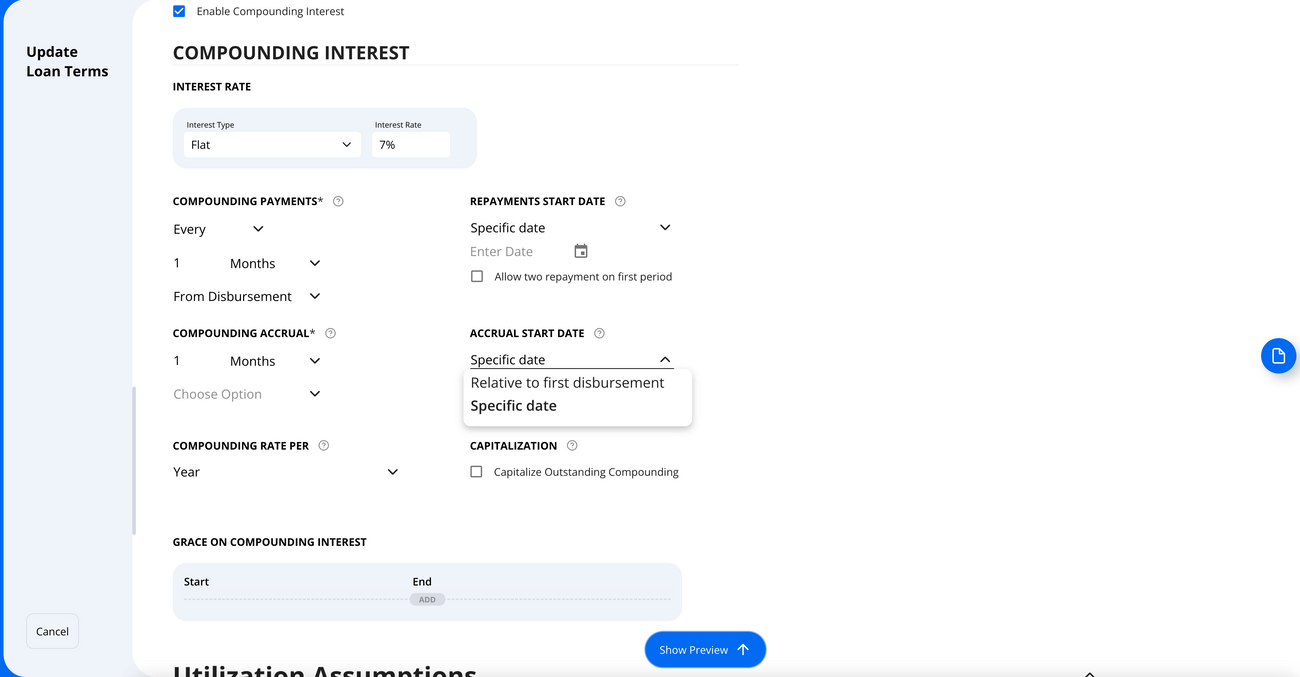
🔵Changing the PIK/Compounding Interest Accrual Start Period
You can adjust when PIK (compounding interest) begins to accrue. This setting defines the first date on which compounding interest becomes outstanding.
How to Change the Accrual Start Period
- Open the Loan Navigate to the relevant loan.
- Edit or Create Terms Click Update Terms, or create a new set of terms if needed.
- Access Compounding Interest Settings Scroll down to the Compounding Interest section.
- Set the Accrual Start Date In the Accrual Start Date field, choose when compounding interest should begin.
- You can set a specific calendar date, or
- Select a date relative to the first disbursement.
This date determines when PIK or compounding interest will first start accruing and be reflected in the outstanding balance.
🔵Step-down PIK/Compounding Interest
A Step-Down PIK structure is used when the PIK (compounding) interest rate decreases after a certain period. This can be configured directly within the loan terms. There are two ways to apply a step-down PIK on a loan.
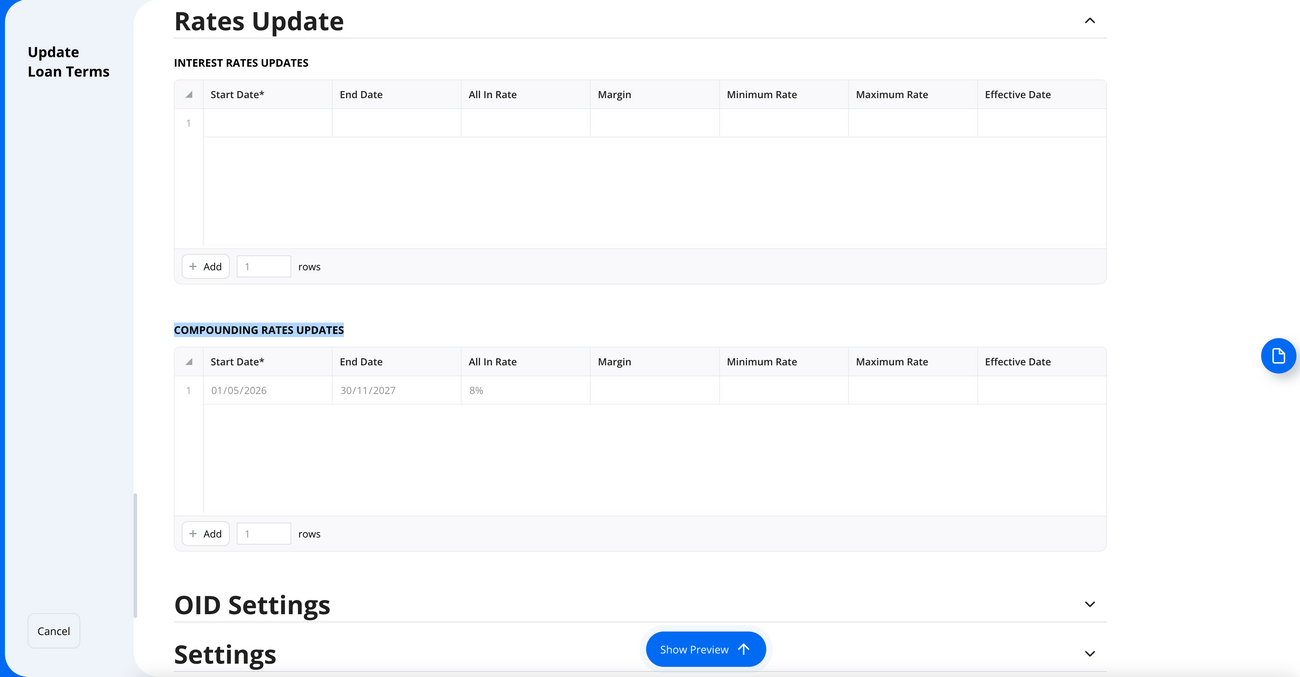
Using Rate Updates (Recommended)
- Update the terms of an existing loan or Create a Loan Go to the relevant loan with PIK / Compounding Interest, or create a new loan using those settings.
- Configure PIK / Compounding Interest In the Loan Terms section, enable and configure the PIK / Compounding Interest parameters as needed.
- Add Rate Updates Scroll down to the Rate Updates section. In the Compounding Rate Updates table, enter each period where the PIK rate changes. For each update, define:
- Start Date and End Date
- Updated PIK Rate
- You can also set a Margin, Min rate, Max rate, and an Effective date - similar to the usual interest settings.
- Review the Schedule Once all rate periods are entered, open the Schedule Preview to confirm that the step-down changes appear correctly.
- Save the Terms When everything looks correct, click Submit & Continue or Update Existing Terms to apply the configuration.
Using Terms Update You can also apply a step-down PIK by creating a new set of terms with the updated compounding rate.
- Open the Existing Loan Navigate to the loan where the PIK rate needs to change.
- Add a New Set of Terms Click Add Terms to create a new set of loan terms.
- Update the Compounding Interest Rate Scroll to the Compounding Interest section and update the PIK Rate to reflect the new, lower rate.
- Review the Schedule Open the Schedule Preview to confirm that the new rate applies from the correct date onward.
- Apply the Changes Click Update Existing Terms or Create New Terms, depending on your preferred workflow.
Note:
Each rate period must include both a start and an end date so Hypercore can calculate the correct accrual for each period. If only one period is defined, the PIK rate will remain constant for the full term.
3. Interest Rate Adjustment (Fixed ↔ Floating)
Example: Switching from a 6% fixed rate to Prime + 3%.
- Open the loan → Terms tab.
- Select + “Add Terms”
- Set the term update date (e.g.,
15-Sep-2025) for the new rate. - Update the Interest Rate Type:
- From: Fixed (6%).
- To: Floating (Prime + 3%).
- Save the terms.
- Validate in the Schedule view:
- Prior to effective date → Fixed 6% applies.
- From effective date onward → Floating Prime + 3% applies.
🔵Changing the Cash Interest Accrual Start Period
You can adjust when interest begins to accrue on a loan, for example, when using cash interest (regular interest) instead of compounding.
How to Change the Accrual Start Period
- Open the Loan Navigate to the relevant loan record.
- Edit or Create Terms Click Update Terms, or create a new set of terms if needed.
- Show All Fields In the top-right corner, toggle Show All Hidden Fields to display additional settings.
- Access the Interest Section Scroll down to the Interest section.
- Enable Custom Accrual Period In the Interest Accrual Period area, turn on Accrual Period Different From Payment.
- Set the Accrual Start Date Once enabled, define the Accrual Start Date.
- You can select a specific date, or
- Choose a date relative to the first disbursement.
This determines when the loan’s interest begins to accrue, independent of when interest payments are scheduled.
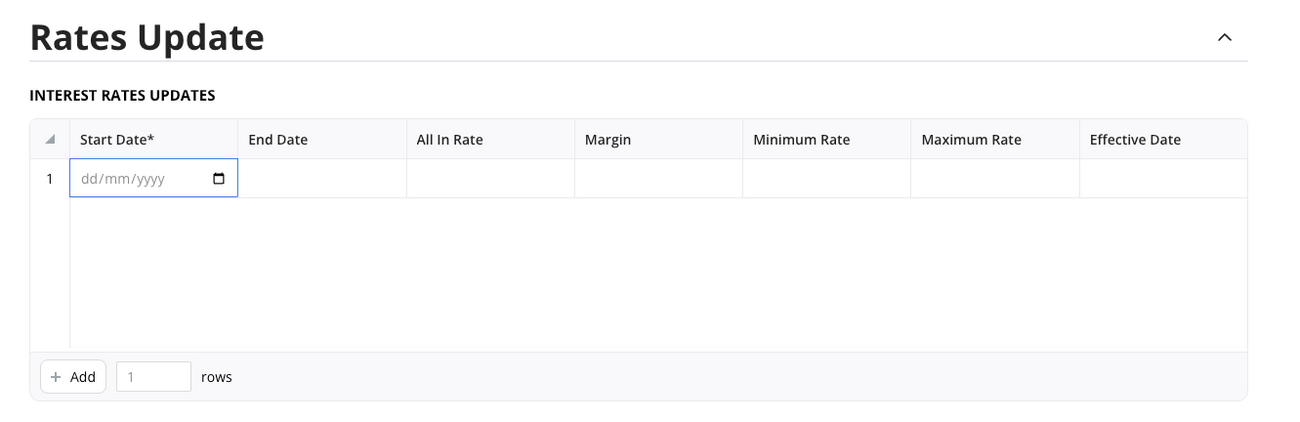
4. Periodic Interest Rate Adjustment
Example: Switch from a fixed 6% rate to 8% for the period Jan–Jun 2026, then revert to original rate.
- Navigate to the loan record → Terms Tab.
- Click ➕ Add Terms.
- Set Terms Update Date = 01-Jan-2025.
- Navigate to Rates Update
- Enter the Start date (01-Jan-2026)and the end date as (30-June-2026)
- Enter the new rates
- Save by updating existing terms
5. Grace Period/ Non accrual periods on Principal/ Interest
- Navigate to loan → Terms Tab → Add Terms.
- Set Terms Update Date
- Locate: Principal Grace Period → set number of periods/months.
- Locate: Interest Grace Period → set if borrower also pauses interest payments.
- Save by updating existing terms
6. Changes to amortization methods
- Navigate to loan → Terms Tab → Add Terms.
- Set Terms Update Date
- In the Principal section, change Amortization Type:
- Equal Principal (fixed principal, declining payments)
- Equal Installments (fixed total payment, shifting interest/principal split).
- Save by updating existing terms
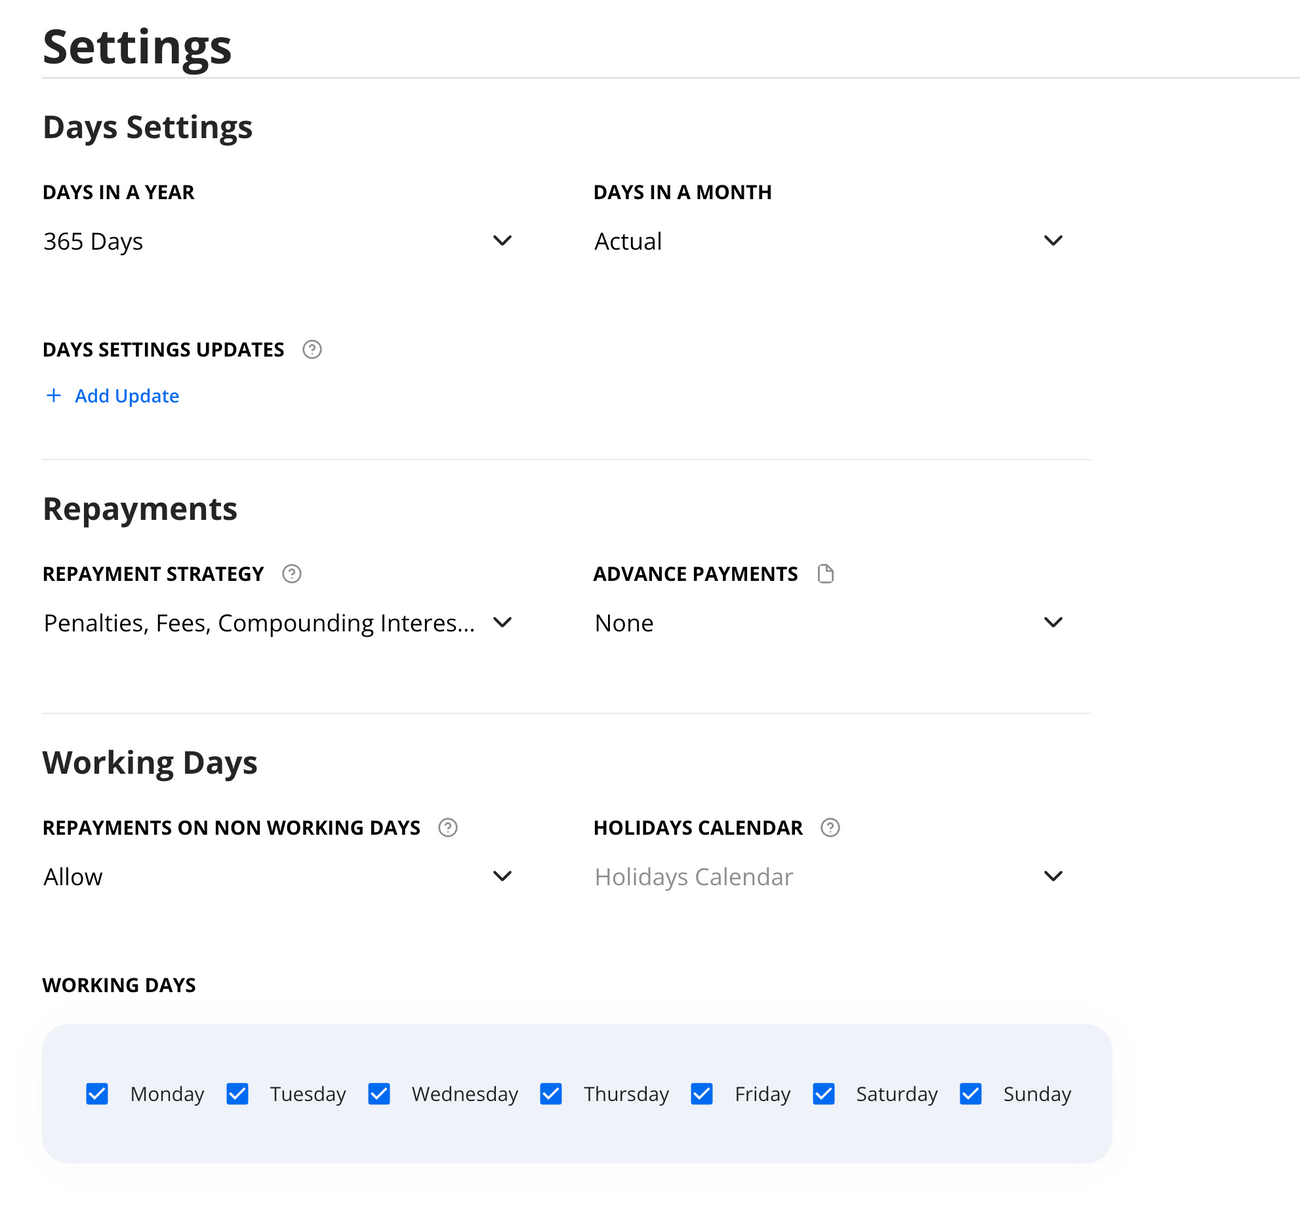
7. Changes in the days setting / non-working days or holidays
- Navigate to loan → Terms Tab → Add Terms.
- Set Terms Update Date
- Navigate to Settings / Days Settings:
- Select new Day Count Convention (e.g., Actual/360, Actual/365, 30/360).
- Set non-working days (e.g., weekends or jurisdiction-specific days) by unchecking the relevant options.
- Set the Holidays Calendar to treat holidays as non-working days.
- To configure a Holiday Calendar a specific region please contact your customer success manager.
- Save by updating existing terms
Best Practice (applies to all amendment types):
- Always set and confirm the Effective Date before saving.
- Add a note/comment for audit purposes by clicking the 📝 note icon next to each field.
- For multi-tranche facilities, confirm whether changes apply at the loan level or the facility (parent) level.
Key Notes
- Pre-filled Terms: The system automatically carries forward the most recent loan terms to save time.
- No Retroactive Impact: Amendments only affect the loan from the amendment date onward.
- Amortizing Loans: If the amendment occurs mid-schedule (e.g., extending a maturity date), payment amounts will adjust going forward.
Need Help?
For additional support, contact us at support@hypercore.ai .